


Final Outcome:
Click the link below to view the booklet in PDF view.
Data-merge Booklet Outcome (PDF View)
Data-Merge:
For this next workshop session, we used InDesign’s DataMerge function to import the data we had collected from twitter. A method of automation; using this technique allowed for content to be embedded within spreads as intended, quickly and effortlessly.
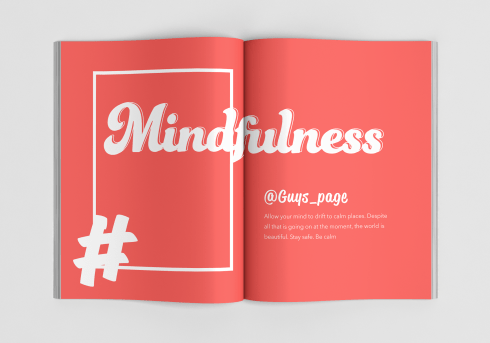
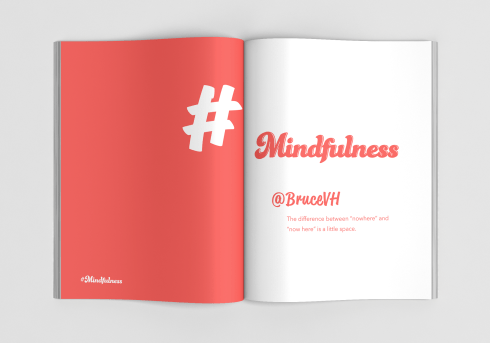
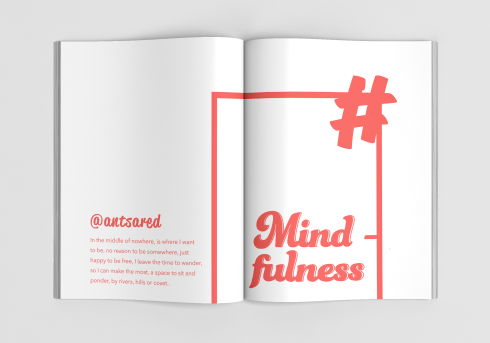
Images below document the methodology of using this data merge function, seen functioning on the live, working InDesign document. A source file is selected where the data can be drawn from. The data-merge tool automatically selects the subheadings from the source document, which can then be dragged and dropped into the master pages, providing and embedding the data. When the data merge is ran, the completed document of data is distributed throughout the spreads as specified, displaying relevant data from the source sheet.


These screen shots display the ‘Data Merge’ controls, as seen from a user view across the working document. The 3rd image displays the master page view, where the data merge function have been imported across, producing the link to the source file.

This is a screen-shot taken from the source file, a Microsoft Excel document. Here, you can see how the data has been organised in a way that can be interpreted and understood by InDesign’s data merge tool. This also provides insight of where the headings come from, which have been dropped into the master spreads on my booklet.
This data file of my #mindfulness tweet information has to be saved and exported as a .csv file. This means that by default the information was saved with a comma delimiter dividing up information across cells of the spreadsheet. This export pre-set is essential for the data merge to work successfully and as intended, for InDesign to recognise the data format, and for it to be able to divide up the information correctly and distinguish between distinct subheadings.
When data-merging, I ensured that the software was bringing in one set of information per page, so that as a designer, I can specifically control the organisation and distribution of content.
Issues/ Learning Curves/ Personal Dilemmas:

When I was trying to link my source file to my InDesign document, I received the above error message. I had to troubleshoot the problem and diagnose the root cause. Following some research, I found that the problem was because of the file extension. To fix the issue, I had to re-export the data file as a different .csv variant, which then allowed for the InDesign file to correctly be able to read my data information.
Overset Text: This also proved to be another issue I experienced when performing the data merge. A warning was brought up showing that certain pages had over set, meaning that some of the information contained within the excel document was too long to fit in the text boxes I had provided. To fix this issue, I altered the master pages to elongate the text boxes where appropriate.
However, despite making this adjustment, I still had some overset text warnings. These were predominantly for long usernames. To fix this, I had to make an adjustment to the character styles, reducing the pint-size to 50pt, as opposed to 60. I made this adjustment to all my username styles in order to induce consistency.
Widows: Another issue I encountered when performing the data merge; on review of my completed pages, I noticed that certain paragraphs had a widow at the end. This is a single word that sits alone on the final line of the paragraph, reducing flow and making the layout appear less desirable and considered. To solve this problem, I reviewed each page and slightly adjusted the tracking on those where this was an issue. This was however, not a fast or automated process like the data-merge was, but would be essential if printing, especially commercially.
An example of fixing a widow on my document is embedded below. Tracking was manipulated from a value of 0 to -10, as displayed on the screenshots.


Reflection:
On reflection, a level of satisfaction is established, as I feel that the data-merged booklet has been completed with professionalism. Design choices were made with reference to current successful brand identities, as well as inspirational references.
I have considered the application of a house style, adapting each spread’s master design to a level of design consistency. Font pairing and character stylise were also thought about, to ensure that these elements compliment each other visually throughout the final outcome, while displaying a correct level of hierarchy as intended. Negative space and general composition has been controlled using grids, to ensure that spacial balance exists in a controlled and logical way, strengthening the aesthetic qualities. Each of these decisions were made with consideration and references of the inspirational resources I studied.
Printing:
To finalise this workshop, I would have liked to have printed my booklet out, to create a fully functioning piece of design with its intended purpose. However, due to Covid-19 and the global pandemic, I was unable to have access to the printer/ studio, in able to fulfil this task.
Instead, I will document here how I gained knowledge of this process, with some mock-up concepts of how a selection of pages would look.
Printing booklets with facing pages/ double page spreads can be complicated due to having to impose the pages in a certain order, i.e. the front and back pages would have to be printed together, then the first and last page, then the second and second to last page, etc, etc. When printing commercially and sending to a professional printer, these will often have software pre-installed to automatically impose these pages/ spreads for you. So, the document can be sent directly from InDesign straight to the printer.
The most common printing preset is 2-Up Saddle Stitch, which refers to two spreads per page, stitched along the spine in the centre. Because of this, spreads and publications designed for commercial printing need to have a total number of pages that is a multiple of 4, to avoid any unnecessary blank pages.


The above screenshots provide insight of the document presets for bleed initiation and print settings.
I set the bleed to 5mm which is large enough and suitable for an A4 document to ensure that where solid colour meets the edge of a page, it will deliberately overprint before being trimmed down. This is how commercial products are created to such high standard, where there is no white clipped margin where the printer was unable to print to the edge of the page. When sending a document to print, it is important to have these bleeds set up so that the printer knows what to do, and so therefore, the layout and editorial design of the spread/ publication isn’t compromised.

This image documents clearly how the bleed settings are displayed on the working document in InDesign. The red line surrounding the page displays the overprinted section. As noticeable above, the section of red pigmentation has been distributed up to this line, to ensure that the document prints as intended.
Mock-Up Print:

Full Booklet:
Below, I have imported each individual spread in a tiled mosaic composition, to compress the amount of imagery to allow for easier scrolling.
To view in PDF, click here!


One thought on “[Nadine] Week 3”